Best Webcam for Remote Presentations Compared
A remote presentation can lose authority in seconds when the camera crops your head, hunts for focus, or leaves you as a dim silhouette against a bright window. The best webcam for remote presentations is not simply the model with the highest resolution. It is the camera that maintains a professional frame while you explain a slide, demonstrate a product, write on a board, or move naturally during a live session.
For trainers, corporate communications teams, educators, consultants, and livestreaming professionals, the practical choice is usually a 4K webcam with intelligent tracking or flexible framing control. That combination improves image detail, reduces manual adjustment, and gives a one-person presenter a more controlled production workflow.
What a presentation webcam must do well
A standard desk webcam can be adequate for a short internal call. A remote presentation creates different demands. Viewers need to see facial expressions, gestures, product samples, documents, or a whiteboard without distracting camera movement or soft focus. The presenter also needs a setup that works repeatedly without turning every meeting into a technical rehearsal.
Image quality is the starting point. A 4K sensor provides more detail than 1080p and, just as importantly, gives the camera room to crop or reframe while retaining a clean Full HD output. This is useful when the camera follows a speaker across a standing desk or presentation area. Resolution alone does not guarantee a better image, though. Lens quality, exposure control, autofocus performance, and available light determine whether 4K footage actually looks polished.
Framing is the next priority. Fixed webcams are designed around a seated user in a predictable position. If you present standing up, move between a monitor and a whiteboard, or bring an object into view, a fixed field of view can become restrictive. AI tracking and PTZ movement solve that problem by keeping the subject positioned appropriately without a camera operator.
Finally, consider control. A professional remote workflow benefits from the ability to select tracking modes, adjust image settings, save positions, and control the camera from software or a dedicated controller. This matters more when the webcam is part of a recurring webinar, training room, podcast, or hybrid event setup.
Best webcam for remote presentations: choose by workflow
There is no single best webcam for every presenter. The right model depends on whether you stay seated, teach while moving, need network video, or expect to expand into a multi-camera production.
For executive calls and desk-based presentations
A compact 4K webcam with strong autofocus and automatic exposure is the sensible choice for presenters who work primarily from a desk. Look for a natural field of view that includes your shoulders and gestures without making your face appear distant. A camera with adjustable framing is preferable to one locked into an overly wide perspective, particularly in a home office or small meeting room.
This category suits client pitches, sales demos, remote interviews, and internal presentations where the speaker remains in one position. A quality USB connection keeps setup straightforward, while 4K capture provides sharper detail for video platforms that support higher-resolution input or for recorded content that will be edited later.
The trade-off is physical flexibility. A fixed webcam cannot reframe a presenter who walks to a display or turns toward a product table. If your delivery is more active, a tracking camera is worth the additional investment.
For trainers, educators, and active presenters
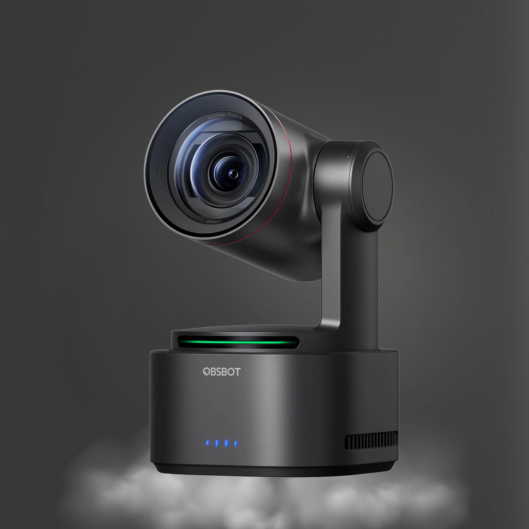
An AI-powered PTZ webcam is often the stronger option for teaching and presentation work. Models such as the OBSBOT Tiny 2 use 4K imaging, motorized pan and tilt movement, and AI tracking to keep a presenter in frame. Rather than remaining locked to the center of a monitor, the camera can follow movement across the presentation area.
This is especially valuable for instructors using a whiteboard, fitness coaches demonstrating movement, product specialists showing equipment, and speakers who prefer to stand. The audience receives a more natural view, and the presenter avoids pausing to reposition a webcam manually.
Tracking should be evaluated for behavior, not just the presence of an AI label. The best systems provide responsive subject recognition while allowing the user to choose a suitable framing mode. A close upper-body frame may work for a keynote-style presentation, while a wider shot is better for demonstrations. Gesture control can also be useful when it lets the presenter start tracking or change framing without reaching for a keyboard, but it should support the workflow rather than become another feature to manage.
For networked rooms and higher-end production
If a presentation camera will be installed in a conference room, classroom, studio, or event space, consider an NDI-capable PTZ camera rather than a conventional USB webcam. NDI transmits video over a local network, reducing the need for long HDMI or USB cable runs and making it easier to route camera feeds to a switcher, encoder, or production computer.
This configuration is appropriate when multiple sources must be managed: a presenter camera, presentation slides, a document camera, and a second angle for demonstrations. A dedicated camera control workflow can provide preset positions for a lectern, whiteboard, product table, or seated interview position. That level of repeatability is difficult to achieve with a basic webcam.
The trade-off is complexity. NDI requires a reliable network and a team that understands IP video configuration. For one presenter on Zoom or Microsoft Teams, USB is usually faster to deploy. For recurring broadcasts and hybrid events, networked video can reduce operational friction over time.
Specifications that affect the final image
Do not compare webcams by resolution alone. For remote presentation work, these specifications have a direct effect on what viewers see.
A larger sensor and quality lens generally improve detail and low-light performance, but good lighting remains the better investment when the room is dark. Position a soft key light in front of the presenter, slightly above eye level. Avoid placing the main light source behind you, since even advanced exposure systems can struggle with a bright window in the background.
Autofocus should be fast enough to handle a presenter moving forward to show a product, then stepping back to continue speaking. Slow focus transitions look unprofessional in a live session. Face-priority exposure and autofocus are helpful, provided they do not overreact to slides, screens, or reflective objects entering the frame.
Field of view deserves careful attention. A very wide lens can be useful in a small room or for a group, but it can also make a solo speaker look small and reveal more background clutter. Adjustable digital framing or a PTZ camera gives you more control than choosing one permanently wide lens angle.
Frame rate matters when your presentation includes fast hand movements, product demonstrations, or live streaming. Thirty frames per second is sufficient for most meetings and webinars. Sixty frames per second can produce smoother motion, but it may require more bandwidth and does not replace good lighting or thoughtful framing.
Audio is part of the camera decision
A high-end webcam cannot compensate for unclear speech. Viewers will tolerate a slightly imperfect image longer than they will tolerate echo, background noise, or distant voice pickup. Built-in webcam microphones are convenient for quick calls, but they are rarely the right choice for client-facing webinars, paid training, product launches, or recorded presentations.
For a seated presenter, a USB conference microphone or compact desktop microphone can provide clearer voice pickup. For presenters who move around a room, a wireless lavalier system is often more effective because the microphone stays close to the mouth. A shotgun microphone can work well when mounted close to the presenter and aimed precisely, but it is less forgiving in reflective rooms.
Keep the audio path simple. Use headphones when needed to prevent echo, monitor levels before going live, and place the microphone according to its pickup pattern. A camera upgrade paired with purpose-built audio equipment produces a more credible result than spending the entire budget on video alone.
Build a presentation setup that stays reliable
Mount the webcam at eye level or slightly above it, not on a low laptop screen. This creates a more direct connection with viewers and prevents an unflattering upward angle. Place the camera close to the content you reference most often, so your eye line does not drift far from the lens while speaking.
Before a recurring presentation, save a repeatable setup: camera position, tracking mode, exposure settings, light placement, microphone level, and presentation software layout. If you use a virtual background, test it with the actual camera and lighting rather than assuming it will work under webinar conditions.
For advanced workflows, route cameras and slides through a live video switcher. This allows clean transitions between a presenter shot, screen share, document camera, and pre-recorded media. It also gives small teams a controlled way to produce professional sessions without a large control room. Kong Kei Industrial’s focused range of OBSBOT cameras, video switchers, and CKMOVA audio equipment supports this type of compact production stack.
The best choice is the webcam that fits the way you actually present. If you remain at a desk, prioritize 4K detail, autofocus, and controlled framing. If you teach or demonstrate while moving, prioritize AI tracking and PTZ control. Then give that camera the lighting, microphone, and mounting position it needs to make every presentation look intentional.